
4 Tips to Make Your Zoom Lessons More Interactive in K-5 Classroom
Teachers in my school are concerned that “Students don’t have the opportunities to make meaningful interactions, so they’ve had difficulty picking up new knowledge and skills.”
Online teaching is challenging but rewarding. The four tricks below help create a more interactive online learning environment, so by implementing them, you will be able to keep students engaged, promote active participation, and excite students (and yourself) for virtual education.
1. Breakout Rooms
Don’t believe anyone that tells you kindergarteners are too little to use Breakout rooms. The only group of students who hate breakout rooms are in college.
Breakout rooms allow you to split your Zoom meeting into up to 50 separate virtual little rooms, and you can go into each little room to see what is happening there. It is a great tool for accommodating the social purposes and instructional purposes of your daily lesson.
My students love using breakout rooms in Social Emotional Learning time. I put different kids in small groups every day so they can greet each other, and share anything they want to talk about (a snowman their family made after the blizzard, or a boring weekend). One of my first graders once told me that he loved breakout rooms because “it felt like we were really in the classroom and I can even show my friends pictures from my mom’s phone!”
Breakout rooms can also be used as a substitute for your “turn-and-talk” time. Simply:
Pose a high-order thinking question
Assign students in breakout rooms in groups or pairs
Bring everyone back to have a discussion
It’s not hard to understand how exciting breakout rooms can be for students if you remember how much Facetime you had with your friends and family when quarantine first began.
2. Annotation Tools
I can’t tell you how much joy I saw from my students’ (and their parents’) faces when they wrote on the shared screen for the first time! You and your students should absolutely experience the same delight!
Annotation Tools is the pen symbol on the left corner of your tablet/phone, or the top drop-down menu if you are using a laptop. This feature enables participants to draw and write on a shared screen or whiteboard. Once a participant marks on the shared screen, everyone in the meeting can see it.
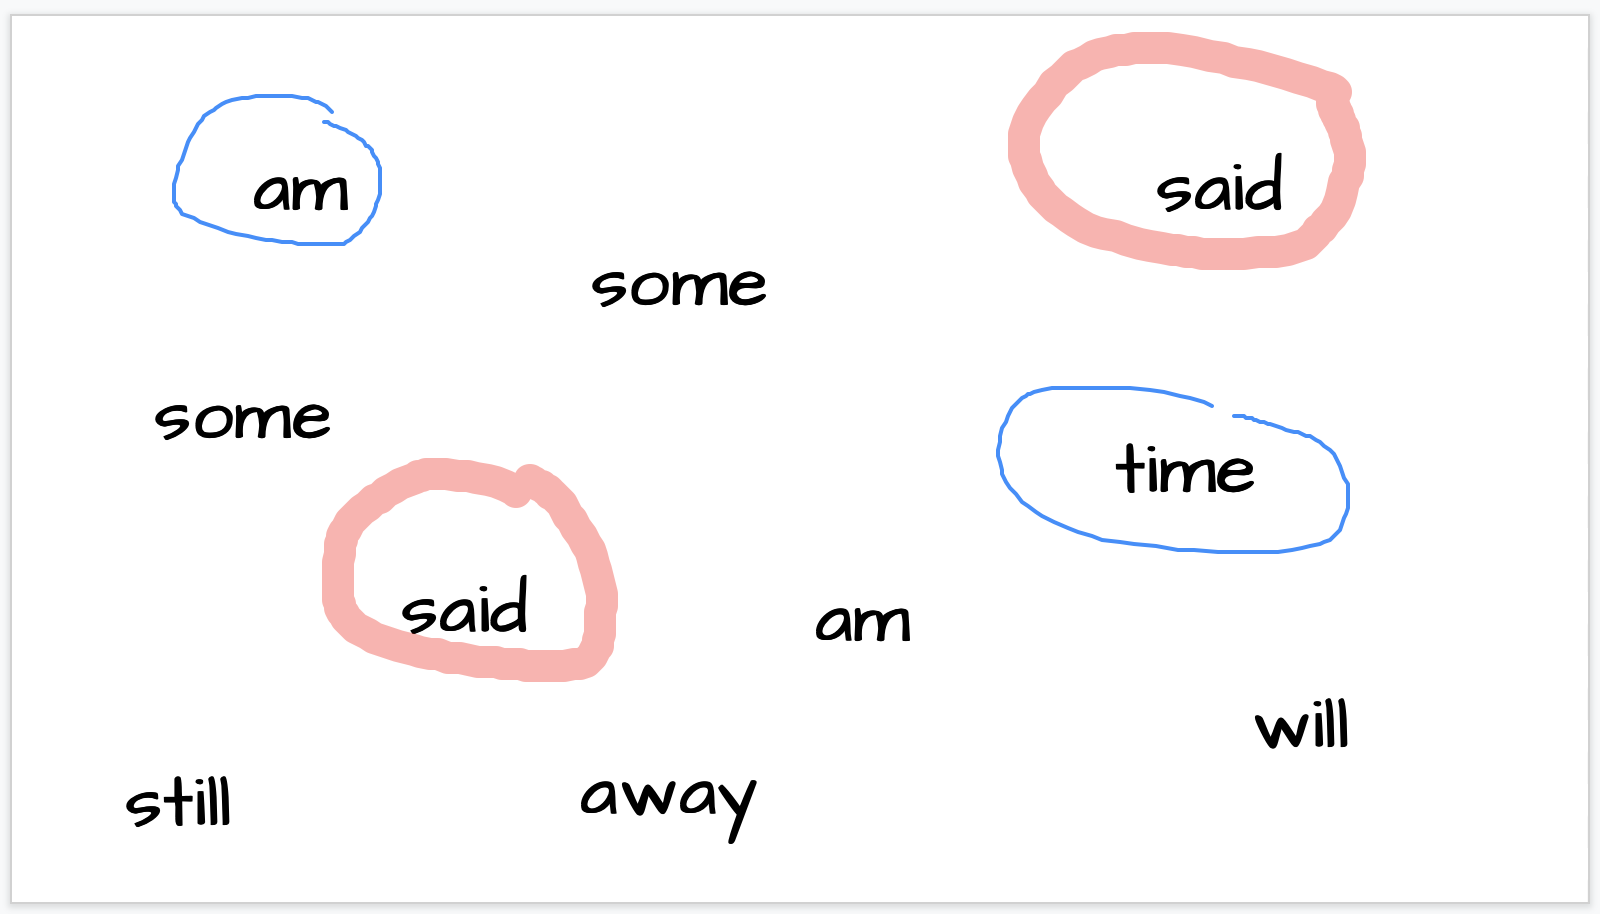
English Language Learners with special needs in my class demonstrated sight word recognition by circling the words I said.

This student showed his thinking process by drawing and writing on the screen when solving the problem of the day.
No more students pointing at their screen saying “there”, “right there” but you had no idea where they were pointing at. Not gonna happen again.
3. Using Shared Slides as Your Virtual Background
My English Language Learners need visual supports such as hand gestures and lip-reading when learning letters and applying phonemic awareness in reading. Sharing the reading slides in the traditional way poses a challenge for them because they need to look at the words on the big screen and my face on the small screen.

Instead of switching their attention back and forth between two screens, students can focus on only one screen. It became easier for them to use visual clues to strengthen their alphabetic and orthographic skills (letter-sound correspondence and letter combinations).
If you are also a fan of children’s literature and enjoy teaching through read alouds, this is the best method for you to create your own read-aloud videos.

Go to Share Screen → Advanced → Slides as Virtual Background and select the slides from your computer.
You will not be able to edit any slide while using this feature, so if you need to drag or type on the slides, you may still want to use the traditional way. (Open the slides on Google Slides or Microsoft PowerPoint and share that tab.)
4. Invite Students to be Presenters
Ask yourself: Who is in control of your Zoom classroom? It’s not a disaster if your students are in charge most of the time. It’s a blessing.
Having students become presenters gives them chances to be a leader in the lesson. They take the responsibility of guiding their peers, which would motivate them to keep editing and revising their work, encourage them to be brave and confident in public speaking, and also put them in your shoes to understand how challenging but rewarding virtual teaching could be.

Go to Security →Allow Participants to: →check Share Screen to
allow your students to share their screen on Zoom.
Assign students to type their writing on Google Docs as the publishing process, and then invite them to take turns to share their screen at the Publishing Party at the end of the Writing unit! “Students in first grade should begin to learn about how technology and digital tools for writing can increase learning and communication (e.g., use technology to write, draw, and explore concepts; continue to explore keyboards, etc.),” according to the Next Generation Standards.
Giving students the opportunity to be presenters shifts the accountability and ownership of learning to students. You want your students to be accountable and responsible for their own learning since good habits are developed at breathtakingly early ages.
Implementing these tricks will make your online lesson a step closer to the in-person instruction we all missed in the good old times, and your virtual students will have the same good classroom experience while sitting in front of their computer.